Marketo SPF & DKIM Configuration Guide for Deliverability

Quick Answer
Configuring SPF and DKIM for Adobe Marketo Engage helps authenticate outgoing emails, improve DMARC alignment, protect domains against spoofing, and support reliable email deliverability. Regular DNS monitoring and authentication testing help maintain sender reputation.
Proper SPF and DKIM configuration is essential for reliable email deliverability in Adobe Marketo Engage. SPF identifies which servers are authorized to send emails on behalf of your domain, helping receiving mail servers verify legitimate messages and reduce the risk of spam placement. DKIM adds a digital signature to outgoing emails, allowing receivers to verify message authenticity and detect unauthorized changes during transmission.
Together, SPF and DKIM strengthen email authentication and help protect your domain against spoofing. When properly configured, these protocols also support DMARC enforcement by allowing receiving mail servers to verify authorized sending sources and message signatures. For Marketo users, maintaining correct DNS records and domain alignment is important for protecting sender reputation and supporting reliable email delivery.
Understanding Marketo’s Sending Domains, Return-Path, and Branding Requirements
Before configuring DNS settings, understand how Marketo Engage uses sending domains, branded tracking links, and return-path addresses. Your visible From address may use your corporate domain, such as example.com, while the technical Return-Path may use a Marketo-managed domain. These are separate email identities.
SPF checks the Return-Path domain, while DMARC evaluates whether the authenticated SPF or DKIM domain aligns with the visible From domain. Because Marketo’s default Return-Path may not align with your From domain, configuring a branded Return-Path and custom DKIM signing can help support DMARC alignment.
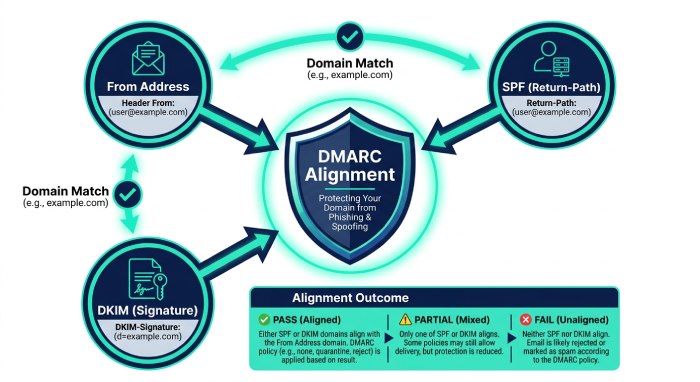
A properly configured sending domain helps protect your brand and build trust with email receivers. Work with your network administrator or DNS owner to add the required TXT records, verify DNS propagation, and confirm authentication settings in Marketo Engage. Regularly reviewing these configurations helps maintain domain security, sender trust, and email deliverability.
Step-by-Step SPF Configuration for Marketo
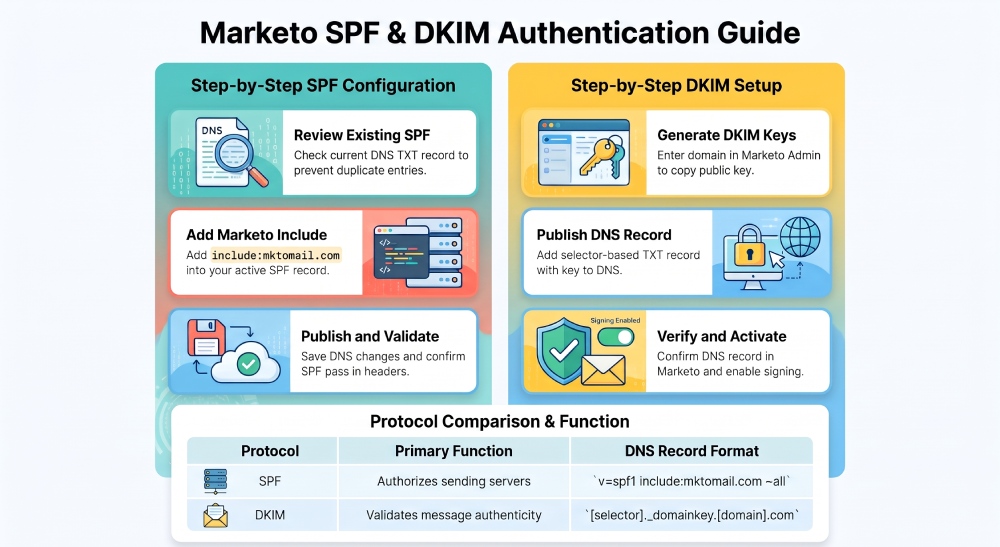
1. Review your current SPF record
Start by checking whether your domain already has an SPF record. An SPF record is published as a TXT record in DNS and usually begins with:
v=spf1Many organizations already have an SPF record for their corporate email server, such as Microsoft 365, Google Workspace, or an internal mail server. You should not create multiple SPF records for the same root domain because multiple SPF records can cause authentication failures.
Instead, update the existing SPF record to include Marketo. This is where your network administrator should confirm current email sending sources, including any corporate email server, third-party platform, CRM integration, or IP-based sending system.
2. Add Marketo to the SPF record
To set up SPF for Marketo, you usually add the Marketo include mechanism:
include:mktomail.comA simplified SPF record may look like this:
v=spf1 include:mktomail.com ~allIf you already have other senders, your SPF record may look more like:
v=spf1 include:spf.protection.outlook.com include:mktomail.com ~allThe exact SPF record depends on your environment. The important point is to add SPF record support for Marketo without breaking existing senders. The include:mktomail.com mechanism tells email receivers that Marketo’s infrastructure is permitted to send mail for your domain.
3. Publish and validate the DNS entry
After editing the TXT record, publish the DNS entry through your DNS provider. DNS propagation can take minutes or hours depending on TTL values and DNS settings.
Once the DNS entry is live, use an SPF lookup tool to confirm the SPF record includes include:mktomail.com. You can also send test messages from Marketo Engage and inspect the message headers to verify that Sender Policy Framework passes.
SPF configuration checklist
Before considering SPF complete, confirm the following:
- The domain has only one SPF record.
- The SPF record includes
include:mktomail.com. - All other approved senders remain included.
- The SPF record does not exceed DNS lookup limits.
- Your network administrator has approved the DNS settings.
- Marketo Engage test messages show SPF pass results.
This permission checklist helps ensure you authorize Marketo properly while preserving authentication for other systems.
Step-by-Step DKIM Setup and Domain Verification in Marketo
1. Generate DKIM details in the Marketo Admin section
Log in to Adobe Marketo Engage and navigate to Admin → Email → SPF/DKIM. Select Add Domain and enter the domain you intend to use in your email From address. Marketo will generate the DKIM DNS information, including the selector and public key. Copy the generated Host Record and TXT Value, which your DNS administrator will need to publish. Marketo retains the private signing key for outgoing messages, while receiving mail servers use the published public key to verify DKIM signatures.
2. Publish the DKIM DNS record
Your DNS entry will usually look like a selector-based TXT record. For example:
selector1._domainkey.example.comAdd the public key provided by Marketo to your DNS TXT record using the correct selector and domain. Ensure the record is properly formatted and free of extra spaces or line breaks to prevent DKIM validation failures.
3. Verify and activate DKIM
After publishing the TXT record, return to Marketo and verify the domain. Once verified, activate DKIM to enable email signing with your corporate domain. This helps mailbox providers authenticate your marketing emails, improves domain alignment, and supports better email deliverability.
How AutoSPF Helps Maintain Reliable SPF Authentication
When organizations use Adobe Marketo Engage alongside Microsoft 365, Google Workspace, and other email platforms, managing SPF records can become more complicated. Each authorized sending service may introduce additional DNS lookup requirements, increasing the risk of exceeding SPF’s 10-lookup limit.
AutoSPF helps simplify SPF management by monitoring SPF records, flattening supported include mechanisms, tracking provider IP changes, and identifying lookup-limit issues. This helps organizations maintain valid SPF configurations as their email infrastructure evolves.
For businesses using Marketo alongside multiple sending platforms, regular SPF monitoring and validation can reduce configuration errors and support consistent email authentication.
Testing, Troubleshooting, and Maintaining SPF/DKIM Authentication
After configuring SPF and DKIM, regularly test emails sent through Marketo Engage to ensure authentication works correctly. Check email headers to confirm SPF and DKIM pass and that the DKIM signature uses the correct sending domain. If SPF fails, review the DNS record, confirm include:mktomail.com is present, and check for duplicate SPF records or propagation issues. For DKIM failures, verify the selector, public key, TXT record, and DNS host name.
Maintain email authentication by reviewing SPF records whenever sending platforms change, testing DKIM after DNS updates, and conducting regular security audits. Assign responsibility for DNS changes and monitor sending IPs, spam placement, and domain reputation. Consistent SPF and DKIM maintenance helps protect your domain from spoofing, strengthen sender trust, and improve Marketo email deliverability.
General Manager
General Manager of DuoCircle. Product strategy and commercial lead for AutoSPF's 2,000+ customer base.
LinkedIn Profile →