Klaviyo SPF Record Setup: Complete DMARC And DKIM Configuration Guide

Quick Answer
Klaviyo SPF setup requires proper SPF, DKIM, and DMARC configuration to authenticate emails and improve deliverability. Add Klaviyo’s DNS records, enable DKIM signing, and publish a DMARC policy to protect your domain from spoofing while maintaining inbox placement.
Try Our Free DMARC Checker
Validate your DMARC policy, check alignment settings, and verify reporting configuration.
Check DMARC Record →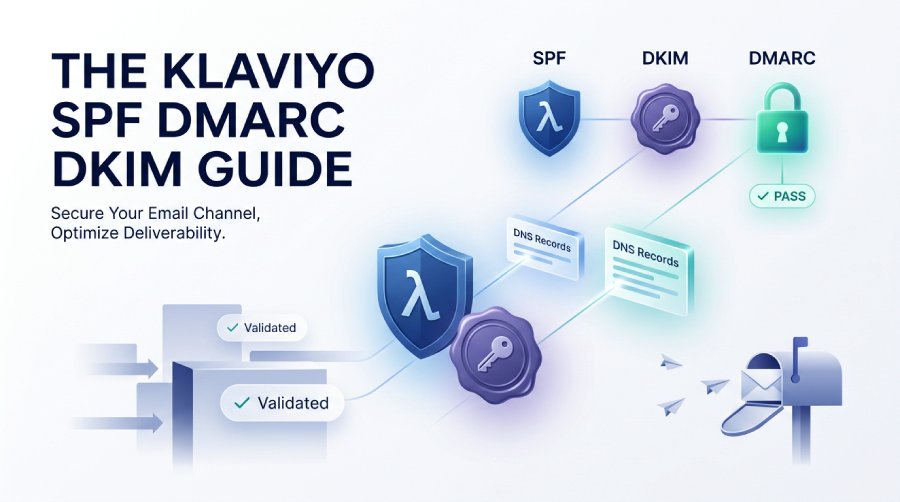
Email authentication is essential for protecting your domain reputation and improving inbox placement when sending campaigns through Klaviyo. While many users search for a Klaviyo SPF record setup, SPF is only one part of a complete authentication strategy. Understanding how SPF, DKIM, and DMARC work together helps ensure your emails are trusted by mailbox providers, meet modern sender requirements, and reduce the risk of phishing or spoofing. This guide explains how Klaviyo handles SPF, how to configure branded sending domains, and the steps needed to properly set up DKIM and DMARC for reliable email deliverability.
How Klaviyo Handles SPF: What You Need to Know Before Editing DNS
Klaviyo handles SPF differently than many senders expect. In most cases, you do not create a separate Klaviyo SPF record on your root domain simply by adding an include: mechanism. SPF is evaluated against the envelope sender, also called the return-path domain, not always the visible from-address, such as marketing@yourbrand.com. That distinction matters for DMARC, domain alignment, and overall email authentication.
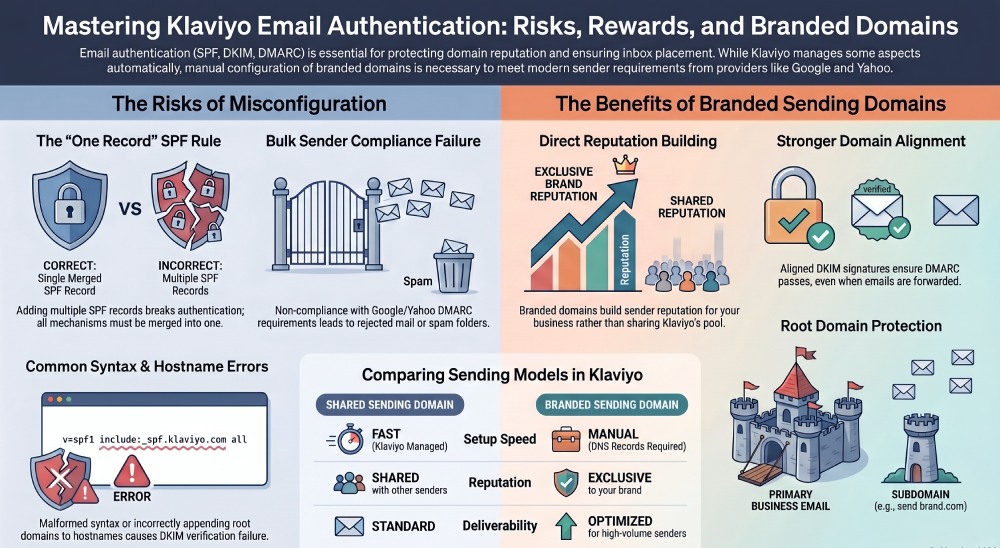
When you send through a shared sending domain, Klaviyo typically manages SPF on its own infrastructure. In that shared sending domain model, Klaviyo’s mail servers use Klaviyo-controlled domains that already include the appropriate authorized IP addresses. This means the SPF record that authorizes Klaviyo’s sending infrastructure is not necessarily the SPF record on your root domain.
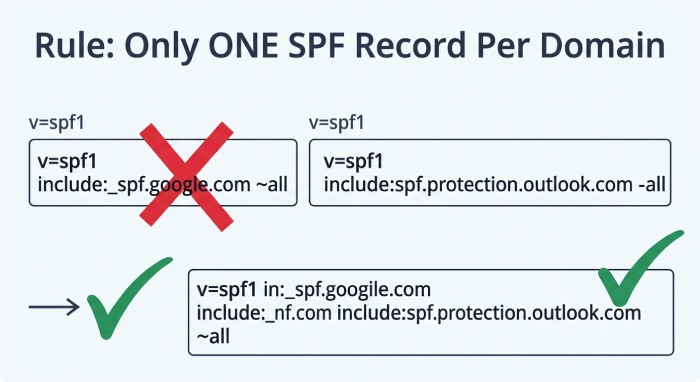
A common mistake is adding multiple SPF records as separate TXT records. A domain should have only one SPF record, published as a TXT record, such as:
v=spf1 include:_spf.google.com include:mail.zendesk.com -all
If your DNS settings already contain an SPF record, adding another TXT record beginning with v=spf1 can break email authentication. Instead, mechanisms must be merged into one SPF record when required. However, for Klaviyo, you should only modify the SPF record if Klaviyo documentation, your DNS provider, your IT team, or a domain administrator confirms that it is needed for your specific setup.
SPF, authorized IP addresses, and Klaviyo sending infrastructure
SPF works by checking whether the sending mail servers are included in a domain’s authorized IP addresses. Those authorized IP addresses may be listed directly, through ip4 or ip6, or indirectly through an include mechanism. Klaviyo’s authorized IP addresses can change as its infrastructure evolves, which is why Klaviyo generally does not ask users to manually maintain raw IP addresses in DNS settings.
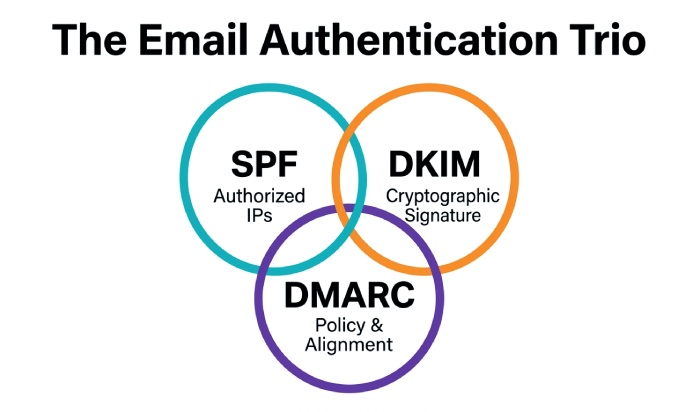
For a shared sending domain, Klaviyo controls the domain authentication layer for SPF. For a branded sending domain, Klaviyo focuses heavily on DKIM authentication and aligned sending identity. In both cases, SPF, DKIM, and DMARC work together as authentication protocols that help mailbox providers verify legitimate mail and improve email security.
Setting Up Branded Sending Domains and DKIM Authentication in Klaviyo
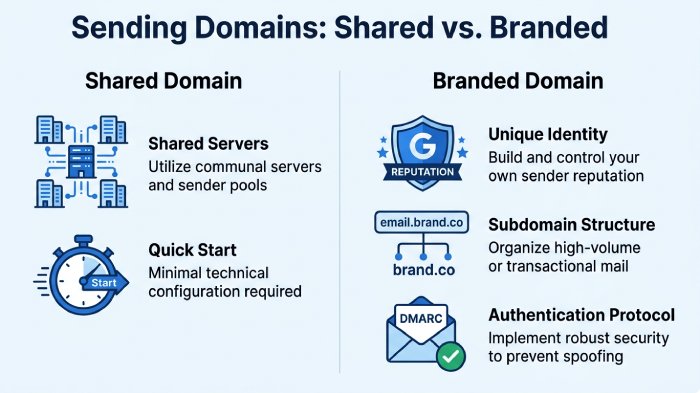
A branded sending domain allows your emails to be sent from a domain or subdomain that represents your brand instead of relying on a Klaviyo shared sending domain. This is important for sender reputation, inbox placement, and sender compliance, especially for bulk senders subject to Google bulk sender and Gmail requirements.
In Klaviyo, the branded sending domain setup process usually involves adding DNS records provided inside the Klaviyo platform. These are commonly CNAME records and, depending on the configuration, may involve NS records for delegated subdomains. You will add these records to your DNS provider, such as GoDaddy, Namecheap, Cloudflare, or another external DNS provider.
DKIM is the core authentication method for a branded sending domain. DKIM uses cryptographic signing to prove that the email was authorized by the sending domain and was not altered in transit. Klaviyo applies a DKIM signature to outgoing campaigns and flows, and mailbox providers such as Google Gmail, Yahoo, Outlook, and other inbox providers validate that DKIM signature against the public DNS record.
Choosing a sending subdomain
Many brands use subdomains such as:
send.yourbrand.com email.yourbrand.com marketing.yourbrand.com
Using subdomains separates marketing email traffic from your root domain, helping protect your primary business email domain. For example, if your business email uses Google Workspace and your from-address is marketing@yourbrand.com, your branded sending domain may still be configured through a subdomain dedicated to Klaviyo.
Klaviyo may provide CNAME records that point your branded sending domain to Klaviyo-controlled hostnames. These records support DKIM, tracking, and domain authentication. Your DNS settings must match Klaviyo’s instructions exactly, including hostnames, values, and trailing dots if required by your DNS provider.
Branded sending domain vs shared sending domain
A shared sending domain is faster to start with because Klaviyo manages much of the email authentication behind the scenes. However, a shared sending domain does not build domain reputation as directly for your brand. A branded sending domain gives you stronger domain alignment, better brand recognition, and more control over long-term email deliverability.
Configuring DMARC for Klaviyo Email Authentication and Compliance
DMARC builds on SPF and DKIM by telling mailbox providers what to do when email authentication fails. A DMARC record is published as a TXT record at _dmarc.yourbrand.com. It contains a DMARC policy and optional reporting instructions.
A basic DMARC TXT record looks like this:
v=DMARC1; p=none; rua=mailto:dmarc-reports@yourbrand.com
The policy tag is the p= value. During initial deployment, many domain owners start with p=none, which enables monitoring without blocking mail. Once legitimate sources are authenticated, the DMARC policy can move to p=quarantine, which may send failing messages to the spam folder, and eventually to p=reject, which tells mailbox providers to reject unauthenticated mail.
DMARC supports phishing protection and spoofing prevention by requiring alignment between the visible from-address domain and the authenticated domain. This is called domain alignment. If Klaviyo signs your email with aligned DKIM on a branded sending domain, DMARC can pass even when SPF alignment is not the primary mechanism.
The rua tag enables aggregate reporting. DMARC reports are typically sent as XML DMARC reports, which are difficult to read manually. A DMARC service provider such as EasyDMARC, Valimail, or Dmarcian can parse the reporting data. Tools from EasyDMARC.com, Valimail.com, and Dmarcian.com help identify misaligned email, unauthorized senders, and sources that need proper email verification.
For bulk sender requirements, Google and Gmail expect senders to use proper SPF, DKIM, and DMARC. Google bulk sender guidance on support.google.com emphasizes authentication, low spam complaint rates, and aligned domains. If you send high-volume marketing email through Klaviyo, DMARC is no longer an optional best practice—it is part of sender compliance.
Step-by-Step DNS Setup: Records, Verification, and Common Mistakes
The exact DNS setup depends on your domain, DNS provider, and Klaviyo account configuration, but the general setup process is consistent.
- Identify your DNS provider: Log in to the platform that manages your DNS settings. This may be GoDaddy, Namecheap, Cloudflare, Google Domains, or another external DNS provider. If you are unsure, check your NS records to see where authoritative DNS is hosted.
- Review your existing SPF record: Search DNS settings for any TXT record beginning with
v=spf1. You should have only one SPF record per domain. Do not create a duplicate Klaviyo SPF record unless Klaviyo or your IT team explicitly instructs you to do so. If an SPF record must be updated, authorized IP addresses and include mechanisms must be consolidated into the same TXT record. - Create the Klaviyo-branded sending domain: In Klaviyo, go to the domain authentication or branded sending domain area and generate the required DNS records. Klaviyo will provide hostnames and values, often involving CNAME records for DKIM and tracking. Some configurations may use NS records to delegate a subdomain.
- Add the DKIM records: Add the Klaviyo-provided DKIM records exactly as shown. DKIM failures often occur because the host field is entered incorrectly, especially when DNS providers automatically append the root domain.
- Publish or update your DMARC TXT record: Add a TXT record at
_dmarcwith a policy such asp=noneduring monitoring. Later, move towardp=quarantineorp=rejectafter reviewing reporting data. - Verify inside Klaviyo: Return to Klaviyo and run email verification. DNS propagation may take minutes or several hours. If verification fails, compare each TXT record, CNAME record, and hostname against Klaviyo’s instructions.
Common DNS mistakes that break authentication
The most frequent issue is duplicate SPF records. Another common problem is assuming SPF authentication alone is enough for DMARC. With Klaviyo, DKIM alignment on a branded sending domain is often the more important factor for DMARC success.
Other mistakes include:
- Adding the DMARC TXT record to the wrong hostname
- Publishing a malformed SPF record syntax
- Forgetting that a shared sending domain behaves differently from a branded sending domain
- Using a root domain when Klaviyo requested a subdomain
- Copying quotation marks incorrectly into DNS settings
- Not involving the IT team, network administrator, or domain owner when DNS access is restricted
If your DNS provider interface is confusing, a third-party professional or domain administrator can help prevent misconfiguration.
Testing, Troubleshooting, and Maintaining Klaviyo Email Deliverability
After setup, test your email authentication before sending major campaigns. Use a DMARC checker such as the EasyDMARC checker, EasyDMARC, Valimail, or Dmarcian to validate SPF, DKIM, and DMARC. These deliverability tools can confirm whether your SPF record is valid, whether DKIM is passing, and whether your DMARC policy is correctly published.
Send test campaigns from Klaviyo to Gmail, Outlook, Yahoo, and other mailbox providers. Check message headers to confirm SPF, DKIM, and DMARC results. In Gmail, “Show original” reveals whether email authentication passed. Look for aligned DKIM on your branded sending domain and review whether SPF is passing through Klaviyo’s authorized IP addresses or shared sending domain infrastructure.
If messages land in the spam folder, authentication is only one factor. Email deliverability also depends on sender reputation, engagement, complaint rates, list quality, and content. Still, failed DKIM, broken DMARC, or an invalid SPF record can severely hurt inbox placement.
Email forwarding can also complicate SPF because forwarded messages may come from mail servers that are not in the original domain’s authorized IP addresses. DKIM is more resilient during email forwarding, which is another reason Klaviyo senders should prioritize DKIM and DMARC alignment.
Maintain your DNS settings over time. When changing DNS providers, moving from a shared sending domain to a branded sending domain, adding new marketing platforms, or changing your from-address, recheck every TXT record, DKIM signature, and DMARC policy. Periodically review XML DMARC reports through a DMARC service provider so you can identify misaligned email, unauthorized systems, and authentication drift before it affects Klaviyo performance.
General Manager
Founder and General Manager of DuoCircle. Product strategy and commercial lead for AutoSPF's 2,000+ customer base.
LinkedIn Profile →