How to Configure DKIM for Simplelists

Quick Answer
DKIM for Simplelists is configured by generating a DKIM record in your Simplelists account, adding the provided DNS record to your domain’s DNS settings, and then verifying it. Once validated, DKIM helps authenticate emails and improves deliverability.

Improve Email Authentication with DKIM
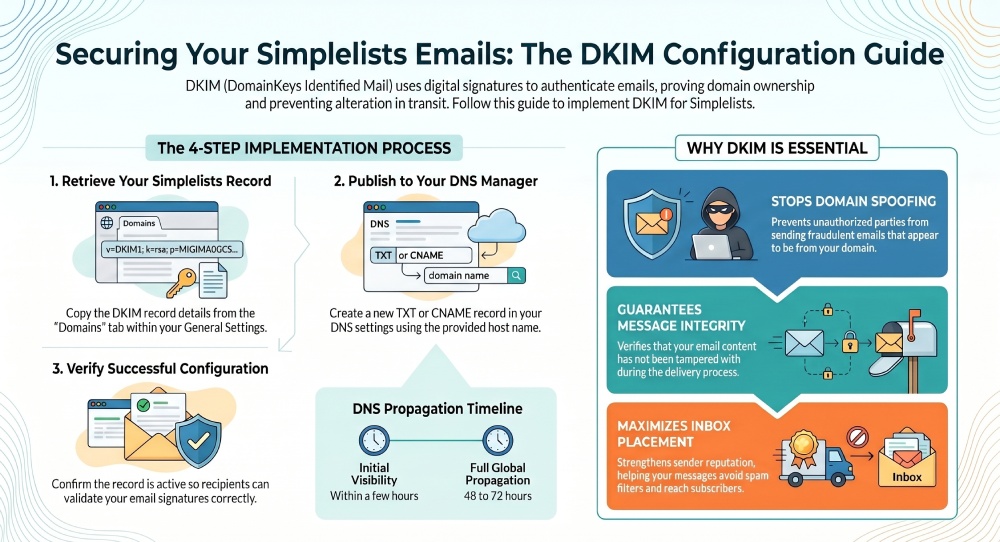
DomainKeys Identified Mail (DKIM) is an email authentication method that helps verify that messages sent from your domain have not been altered during delivery. Implementing DKIM can strengthen your email security, improve inbox placement, and help protect your domain from spoofing and phishing attempts.
This guide explains how to enable DKIM for domains used with Simplelists.
Step 1: Obtain Your DKIM Record from Simplelists
Before adding DKIM to your domain, you’ll need the authentication record provided by Simplelists.
- Sign in to your Simplelists account.
- Open the General Settings section.
- Select Domains from the available options.
- Locate the DKIM information associated with your domain.
- Copy the DKIM record details provided by Simplelists.
If you send email through your own mail infrastructure rather than Simplelists, you can create your own DKIM key pair and use the generated public key for DNS publication.
Step 2: Add the DKIM Record to Your DNS
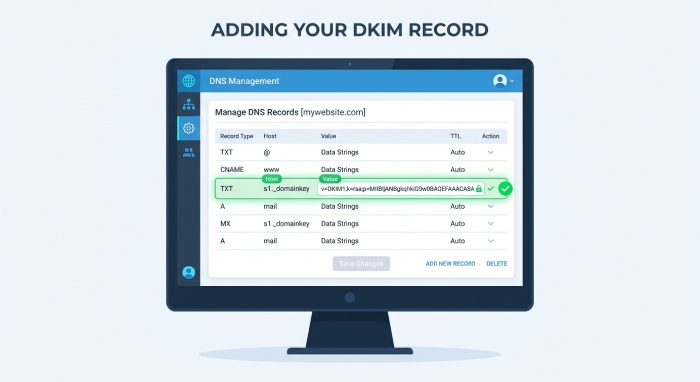 Once you have the DKIM information, it must be published within your domain’s DNS settings.
- Log in to the account where your DNS is managed.
- Navigate to the DNS management area.
- Create the record type specified by Simplelists (typically TXT, though some providers may use CNAME records).
- Enter the DKIM host name and corresponding value exactly as provided.
- Save the new DNS record.
Be sure to verify that there are no formatting errors, extra spaces, or missing characters when copying the record information.
Step 3: Allow Time for DNS Propagation
After saving the record, DNS updates may take some time to become visible across the internet.
- DNS propagation can vary depending on the provider.
- In many cases, updates are visible within a few hours.
- Some environments may require up to 48–72 hours for full propagation.
Step 4: Verify Your DKIM Configuration
Once propagation is complete, confirm that the DKIM record is publicly available and correctly configured.
 Verification helps ensure:
- The DKIM record was published successfully.
- Email recipients can validate your signatures.
- Messages sent through your domain are properly authenticated.
If the record cannot be detected, review the DNS entry for typing errors or incorrect host names.
Why DKIM Matters
Enabling DKIM provides several benefits for organizations using Simplelists:
- Verifies the authenticity of outgoing messages.
- Reduces the risk of email spoofing.
- Helps prevent message tampering during transmission.
- Supports stronger email deliverability.
- Works alongside SPF and DMARC to create a more secure email environment.
Final Thoughts
Setting up DKIM for Simplelists is a straightforward process that involves retrieving the DKIM record, publishing it in your DNS, and verifying that the record is active. Once enabled, DKIM adds an important layer of protection for your domain and contributes to better email security and trustworthiness.
General Manager
Founder and General Manager of DuoCircle. Product strategy and commercial lead for AutoSPF's 2,000+ customer base.
LinkedIn Profile →